Posts

Showing posts from July, 2017

Lab 16: Specific Heat of a Metal

Image
I. Introduction: The purpose of this lab was to  identify an unknown metal by determining its specific heat. To find the unknown metal,   we first put the metal block in water and put it on a hot plate. Once the water boiled, we took the metal out and placed it into a cup of cold water. We measured the temperature change of the metal indirectly by using the coffee cup and the water.  After we recorded  the data, we  calculated the heat gained by the water and then. Using the heat gained and the data collected, we calculated the specific heat of the metal. Finally, we compared our calculated specific heat to a table of metals and their  specific heats and found what our metal was. II. Data:  III.Calculations:  IV. Picture of Setup:  V: Specific Heat and Identification: The specific heat of our metal was 378.9  J/kgC. The closest metal to this specific heat was brass so we identified our metal as ...

Lab 15: Evaporation and Intermolecular Attractions

Image
I.Introduction: The purpose of this lab was to observe 5 substances and observe the differences in temperature of these substances as they evaporated based on their intermolecular forces. We had to measure the temperature of these 5 substances using a LabQuest device  over a 240 second period and record the Initial and Final temperatures of these substances. Finally we had to find the difference (Final- Initial) and compare these to the other substances based on their intermolecular forces. II. Pre Lab Table:  III. Data Table:  IV. Lab Questions:  1.)  Explain the differences in the difference in temperature of these substances as they evaporated. Explain your results in terms of intermolecular forces. The differences in temperature of the five substances varied a lot  because the intermolecular forces of every substances were different. H2O had the smallest difference because its intermolecular force was strong, so it was harder fo...

Lab 14: Create a Smell Lab: Ester Synthesis

Image
I.Introduction: The purpose of this lab was that as combine different acids with alcohol to synthesize  three esters, in order to find what kind of chemical change occurred and to find what the esters smelled like after the chemical change.  We had 3 types of mixtures and each had a different type of alcohol placed inside of it. We had to record the smell of the mixture before we heated them and compare them to how they changed after we heated the mixtures. II. Data Table:  III. Pictures: Test  Tube I smelled like: Test Tube E smelled like: Test Tube M smelled like:  Picture of Tubes being heated:  IV. Analysis Questions: 

Lab 12: Electron Configuration Battleship

Image
I. Picture of My Setup:  II. Biggest Challenge: My biggest challenge playing was trying to do the electron configurations in my head. Also trying to solve the f block configuration in my head was extremely challenging. III. What I Learned: I learned how to solve electron configuration faster and efficiently using the periodic table. 

Lab 11: Flame Test Lab

Image
I. Introduction:  The purpose of this lab was to observe how certain atoms react and release energy within different compounds and solutions. We performed the lab by taking samples of the nine compounds and held them over a bunsen burner. Then, we observed any color or texture changes and recorded them. We also had identify two unknown chlorine compounds using flame tests. To identify the two unknowns, we compared their flame colors to those of the other eight compounds and assumed the solution based of this. II. Pre Lab Questions: III. Data:  IV. Analysis Questions:  Picture of LiCl emitting Pink Light:

Lab 10: Mole to Mass Relationships Lab

Image
I. Introduction: The purpose of this lab was to obtain a theoretical yield and percent yield by using mass to mass and mass to mole stoichometry. We investigated the relationships in the reaction which consisted of sodium bicarbonate and hydrochloric acid. This reaction yielded salt, carbon dioxide, and water after it was heated. Lastly the salt was measured and used to calculate our data. II. Data: III. Questions 1-4: IV: Error/Problems: Our percent error was over 100 percent because we left the reaction heated for too long. This allowed the solid to accumulate more and therefore gaining more mass than the theoretical yield mass. Also, our measurements might not have been precise enough and we took too much acid or baking soda. This could have also increased our mass greatly.  V: Product after Heating: 

Lab 9: Composition of a Copper Sulfate Hydrate Lab

Image
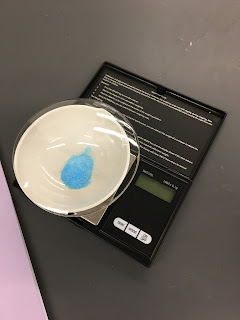
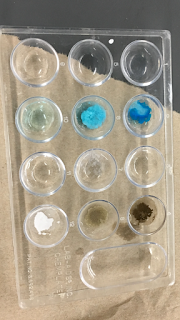
Before Heating:  After Heating:  Questions 1-4: Calculations Question 5 Data:  A possible error we could of had was with the amount of time we heated the Copper Sulfate and also the accuracy of measuring could have been off. (This is the formula for Copper Sulfate)

Lab 8: Mole Baggie Lab

Image
Summary:    The purpose of this lab was to determine the unknown substance inside of a plastic bag using only the information given and mole conversion formulas. For Set A and B bags, the mass of baggie was written on the outside, as well as either the number of moles or number of particles. For the A5 bag, we weighed the whole bag and then subtracted the mass of the empty bag to find the weight of the substance. Then, we calculated the molar mass by dividing number of grams by number of moles. Finally we compared it with the molar mass of the other possible compounds and decided which matched the closest. We did the same for the B3 bag, but we were given the number of particles instead of of the moles. We found out the of moles, by using a formula and then sued the molar mass formula to find the final answer. Conclusion: The bags we had were A5 and B3. A5 had the identity of Zinc Oxide. B3 had an identity of Potassium Sulfate. ...

Lab 7: Reactions Lab

Image
I. Purpose: The purpose of the lab was to observe a variety of chemical reactions and to identify patterns in the conversion of reactants to products. II. Favorite Reaction:  My favorite reaction was number four. We had to combine Hydrogen Peroxide with Manganese Oxide and it created this really dark black cloud liquid. It was really cool when the reaction first started because the whole test tube was bubbling and fizzing up. III. Balanced Chemical Reactions: 

Lab 6: Solid Evidence Lab

Image
I.Purpose: The purpose of this lab was to determine whether certain double placement reactions come out as a precipitate or just have no reaction. II. Well Plate:  III. Balanced Chemical Reactions:  IV.Net Ionic Equations:  V. Most Challenging Part: :  Writing the chemical equations while also determining the solubility was pretty challenging.

Lab 5: Nomenclature Puzzle

Image
I.Goal of Activity:  The goal of this activity was to practice matching chemical formulas and the names of these formulas. II. Biggest Challenge:  The biggest challenge of this lab was trying to start the puzzle. We had no ideas how to start and because of this we messed up a little at the end. F iguring out where the matches were on the triangles and trying to fit together all the pieces was also very challenging. III. Biggest Contribution:  My biggest contribution to the group was being the connector and bridging all the chunks of pieces together into one square. I also helped my group match the correct triangles by looking up the proper names for them. IV. The Puzzle:                                                             (Finished Puzzle)

Lab 4: Atomic Mass of Candium

Image
I.Introduction Purpose:  The purpose of this lab was to determine the average atomic mass (amu) of the element candium, given 3 samples of candium isotopes, Regular M & M's, Skittle, and pretzel M&M's. Average Atomic Mass: 1.053 amu was the average atomic  mass we found for candium. II. Conclusions and Questions 1.) Ask a group nearby what their average atomic mass was. Why would your average atomic mass be different than theirs? Another group's average atomic mass was 1.100 amus. Our average was different from theirs because each isotope varied in amount and total weights. Also, the sample sizes were not very large, so there were more differences. 2.) If larger samples of candium were used, for example if I gave you a whole backpack filled with candium, would the differences between your average atomic mass and others' average atomic masses be bigger or smaller? Defend your answer. The differences would be smaller because, there would be m...

Lab 3: Chromatagraphy Lab

Image
I.Introduction The Chromatography lab was a lab on the technique used to identify and analyze components of a mixture. Paper chromatography  is an easy way to separate  the soluble components of a homogeneous mixture. —Separation is based on Solubility of the sample in the mobile phase. Molecule size Purpose: The purpose of this lab was to reproduce multicolor art patterns with a variety of black ink pens using paper chromatography. II. Lab Questions  1 . Why is it important that only the wick and not the filter paper be in contact with the water in the cup? Answer: It is important that only the wick and not the filter paper be in contact with the water in the cup because only then will the water be evenly distributed and the ink will dissolve properly. If this was not the case, the filter paper would soak and rip. 2.  What are some variables that will affect the patter of the colors produced on the filter pap...

Lab 2: Aluminum Foil Lab

Image
The aluminum foil lab discuses an experiment to determine the thickness (height) of a piece of Aluminum foil given its density. The purpose of performing this experiment is to use the density formula to figure out the thickness of an aluminum foil in  millimeters. In this lab we were given a scale and a piece of aluminum foil. To start with our procedure , we first measured the length and the width of the foil. Next we weighed the piece of aluminum foil on the scale. Then we rearranged the density formula, so we would be solving for volume instead (v=dm). After that we plugged the corresponding values of length,width, mass, and density into the variables. We labeled x thickness during this so we could solve for the variable. Finally we converted the volume side into LxWxH and solved for Height, (X). However we then got an answer in cm, so we had to covert the answer by multiplying by 10, (10mm to one 1 cm). This led to our final answer. The data in this experiment was just a bunch ...

Lab 1: Density Block Lab

Image
The Density Block lab experiment was performed to calulcate the mass of a plastic block given its density and indirectly its volume. Density can be defined as the amount of matter present in a given volume of a substance. The purpose of this lab was to test our accuracy and precision using the ruler to find the mass of a plastic block. Therefore, to prove our accuracy, we needed to note the percent error in our calculated mass compared to the actual mass. Anything below 5 percent was considered to be worthy.The materials we were given for this lab was a sole ruler and a block labeled with the density. The first task we did when we got the block was record its density in our lab books. Next we measured the length(L), width(W), and height(H) of the block. We then multiplied those sides together, thus achieving the volume. After, we used the density formula and converted it to equal mass, (m=dv). Then, we plugged the measurement into the variables, thus achieving the mass of the block. Fi...